personal_wiki
MacOS setup
What you need to know to reinstall MacOS machine from scratch
Disclaimer: Everyone is - and I hope always - free to configure and use tools they like the most. Here’s the one I decide to use.
General knowledge
- use filevault to encrypt data
- update MacOS regularly
- update your soft and tools regularly too
- install Xcode (
xcode-select --install) - install your preferate nav, I use Chrome ¯
\(ツ)/¯ - install iTerm2 to replace standard Terminal
- install GPG Keychain to encrypt/decrypt emails
- install Slack cause, you know, you have to communicate sometimes
- install Airmail, it’s not free but really effective
- install Alfred, not free either but it’s a damn good product which replace poor spotlight
- install ImageOptim to compress effectively your pictures
Other tools
Brew
What is HomeBrew?
HomeBrew is an opensource freeware packet manager for OSX. It’s kind of apt-get but for Mac 🍺
You’ll find everything about it here: https://brew.sh
NB: Cask is an extension for graphical apps
How to install brew?
Install it with curl from your favorite terminal:
/usr/bin/ruby -e "$(curl -fsSL https://raw.githubusercontent.com/Homebrew/install/master/install)"
Some usefull commands
- Check brew state:
brew doctor
- Upgrade brew
brew upgrade
- Update brew
brew update
- Install something
brew install my_fraking_tool
Terminal
I try some terminals but iTerm2 is definitively my favorite.
It sends old terminal back to middle age, and continue to provide improvements
Installation
You have to install it manually from official website
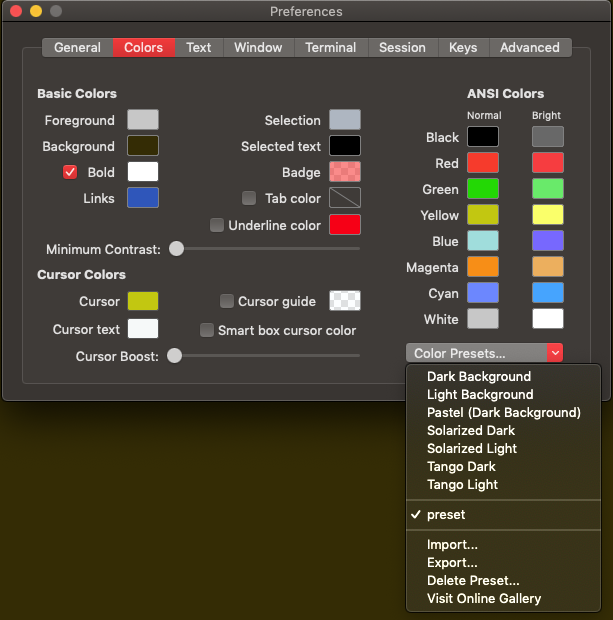
Download preset.itermcolors file
To add custom colors preset on iterm, use ⌘ + i to open preferences, go on Colors tab and import custom preset.itermcolors file. To use it permanently, go back to General tab and click on Copy Current Settings to Selected Profile button
ZSH
ZSH is a command prompt from Bourne Shell family.
Installation
ZSH is already integrated on MacOS, but the default shell is bash. You can activate it with this command:
chsh -s /bin/zsh
But it’s most convinient to reinstall last version using brew:
brew update
brew install zsh zsh-completions
Then, we need to activate autocompletion with fpath:
echo 'fpath=(/usr/local/share/zsh-completions $fpath)' >> ~/.zshrc
Finally, configure the path and activate zsh:
sudo echo /usr/local/bin/zsh >> /etc/shells
chsh -s `which zsh`
You can activate wizard manually:
autoload -U zsh-newuser-install
zsh-newuser-install -f
Configuration file:
OhMyZsh
Oh-My-Zsh (OMZ) is an opensource awesome tooling for ZSH. See everything you need to know in official website
Installation
sh -c "$(curl -fsSL https://raw.github.com/robbyrussell/oh-my-zsh/master/tools/install.sh)"
Customisation
Here’s two cool links to custom your own terminal:
- https://www.synbioz.com/blog/astuces_zsh_installer_et_comprendre_oh_my_zsh
- https://www.synbioz.com/blog/astuces_zsh_plugins_git_oh_my_zsh
GnuPG
GnuPG is a complete and free implementation of the OpenPGP standard. it allows you to encrypt and sign your data and communications, mainly over email.
See according section here
Ruby
There are two main version Ruby manager on MacOS, Rbenv and RVM.
I personaly prefer to use rbenv, here’s why
Another link about it in french
Take note!
Rbenv requires to export specific path to activate it and proceed to eval whenever you start new shell session, here’s how:
# ~/.zshrc

export PATH="$HOME/.rbenv/bin:$PATH"
eval "$(rbenv init -)"
Git
Git is an Open Source Distributed Version Control System
Installation
There are many ways to install Git, here the simple one:
brew install git
Configuration files:
Change language to english using this command:
echo "export LANGUAGE='en_US.UTF-8 git'" >> ~/.zshrc
Git Flow
Git Flow are a set of git extensions to provide high-level repository operations for Vincent Driessen’s branching model.
Installation
Install it with brew, but take note there are two packages for git-flow included a deprecated one. You can use search command:
brew search git-flow

==>       git-flow     git-flow-avh
Please consider to use the maintened one:
brew install git-flow-avh
Usage
You can use this cheatsheet
Some usefull alias
A good IDE
Usually, I used to use ATOM, which was good enough over the past 3 years. But since, I discovered VSCode which is really good (it’s a fork of ATOM after all).
VScode provide a quick setup, using Crtl + Maj + P and search for code. But there is an issue about the fact this command is reset after OS reboot (see here: https://github.com/Microsoft/vscode/issues/48124)
To resolve this issue, just add the path manually on ~/.zshrc or ~/.bash_profile file:
# export vscode path manually since there is a bug with it
export PATH=$PATH:/Applications/Visual\ Studio\ Code.app/Contents/Resources/app/bin
Specific configuration
Add an option to create an new empty line at the end on a file when saving, and to add specific tabSize settings:
⇧ MAJ + ⌘ command + p to open the command palette, then type Preferences: Open Settings (JSON) and add this line to the JSON file:
{
    ...,
    "files.insertFinalNewline": true,
    "editor.tabSize": 2
}
Plugins
VSCode use plugins to implement extra functionalities, such as autocompletion, UI-UX improvment, prefered programming language features, etc.
Here’s the best I use:
- Docker
- file-icons
- Ruby
- Ruby Markers
- Ruby on Rails
- shellman